Showing posts with label englishwedding. Show all posts

Monday, August 11, 2014

20 DIY Table Number Ideas

20 DIY Table Number Ideas


1. Natural Wood Discs

 Use a permanent marker to in script your guests name and table numbers on pieces of wood. If you are using hand-carved wood make sure you smooth the back and front of the discs with sandpaper. Another option is using a wood burning tool to etch the names and numbers into the wood. 


Photo Credit: biscuitsandberries.com


2. Fabric Flag Numbers

These Embroidered Flags add a nautical touch to any wedding. If you don't know how to embroider you can use iron on numbers. 

Photo Credit: weddingbee.com

3. Twine and Wine

Use twine or yarn to wrap wine bottles in your wedding colors then number umber small chalkboard tags. 


Photo Credit: upcycledtreasures.com

4. Carved Straight from a Book

First use a stencil to outline your numbers. Then using an extra sharp exacto knife to cut through the paper on a cutting board. Use several pages to keep the numbers stable and separate the pages when you are cutting from the book to get an easier cut. 

Photo Credit:  Etsy- Love and Found

5.  Pose for a Picture

Whether it's a photo of your pet or of one you and your groom using a cute or funny photo will bring a personalized touch to your table set-ups.

Photo Credit: Heather Parker Photography

6. Books by Number

Grab some hard back books and remove the book jacket. Affix numbers to the front of the book leaving them bare or painting them to match your theme. 

Photo Credit: Next Exit Photography

7. Stencil Design

Stencil your numbers onto the end your table runners for an elegant display.


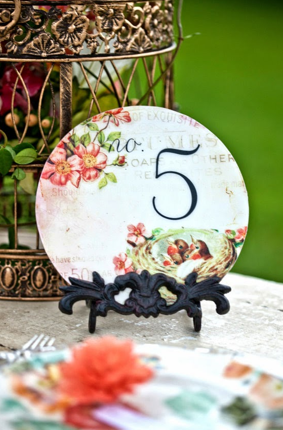
8. Dinner for Five

Re-imagine dinnerware to serve guest their seat by using a stencil and glass paint on a vintage plate. 

Photo Credit: Etsy Company 42


9. Yarn Numbers

First stencil your number design onto your wooden piece. Next use nails to outline your number. Make sure to use a ruler so that the nails are placed evenly. Begin by making a knot on one nail. Next wrap the yarn around the outside of a nail and work your way up and outline the number. After that weave the yarn back and forth to fill in the number. Remember to knot off the end.


10.  Under the Magnifying Glass

Use die-cut plastic numbers simply place onto a magnifying glass. You should not need any adhesive, but you can use a glue gun if necessary.

Photo Credit: kwp weaver photography


11. It's Dinner O'Clock

Use small clocks to tell guests what 
"time" they are seated. 

Photo Credit: rustic-crafts.com

12. Yarn Wrapped Numbers

Using a small amount of glue affix the end of the yarn. Next wrap your letter with yarn covering the entire number. 


Photo Credit: lover.ly

13. Corked Bottle Numbers

Using an old-fashioned or wine bottle slice into the cork and place your paper number into the space. 

Photo Credit: weddingbee.com


14. Steampunk Vintage

Take Vintage Frames and glue fabric or paper flowers to the top and then drape with pretty pearls. Print the numbers from your home computer. 

Photo Credit: Etsy Lis'

15. All for Wine and Wine for All

Choose you and your partner's favorite wine and customize the label with your table numbers and wedding date. Guests have never enjoyed table seating more. 

Photo Credit: marthastewart.com


16. Embroidered Numbers

Use pretty coordinating fabrics  to embroider your table numbers and leave them in the embroidery hoop. 

It's not that hard! : How to Embroider

http://www.instructables.com/id/Embroidery-101/


Photo Credit: www.weddingwindow.com


17. Hot Air Balloon 

Use helium filled balloon to create hanging whimsical table numbers. It's best to design these ahead of time, so either pre-paint the balloons using your own hot air or purchase pre-designed balloons. Create baskets using small plants and secure with twine or reinforced ribbon. 

Photo Credit: www.confettidaydreams.com

18. A Touch of Terrarium 

For an elegant setting place wedding numbers in a terrarium. 

Photo Credit: greenweddingshoes.com

19. A Watering Can Wedding

Paint your wedding numbers on an old watering can. If you must buy new, buy a watering can with a rougher exterior which will help the paint stick to the surface.

Photo Credit: thenaturalweddingcompany.co.uk

20. Mirror, Mirror at the Ball

Using glass paint brush table numbers onto vintage mirrors. 

Photo Credit: www.bellethemagazine.com


Don't forget all of these items can be mixed and matched to fit your taste and style. 

~Mandi Bridgeman


Tuesday, June 17, 2014

Throw the Perfect Tea Party Wedding Reception


You can't have a tea-party without tea cups. Use vintage tea-cups everywhere! Don't worry they don't have to match. 

blog.tbdress.com
www.lovewedbliss.com
www.oncewed.com


 Add antique elements like vintage clocks, books, photos and broaches...
www.elizabethannedesigns.com

www.thesweetestoccasion.com
whimsicalwonderlandweddings.com
Don't forget the yummy treats and tea sandwiches
www.projectwedding.com
http://plectrumbanjo.info
www.100layercake.com
www.cakechooser.com


Make a special tea bar for your guests. Forget the candy bar (ok, so maybe not) and make your reception extra special with a tea bar. Use loose leaf tea or tea bags to give your guests a wide selection of flavors.


acrimsonkiss.com

bridalguide.com

savethemilkyway.org


Other fun ideas


Tea Cup Seating Cards


Forget the Cake…Let them eat Pie! 
theweddingoutlet.com

Or have both

flickerriver.com

love-the-day.com

londonmoorebeauty.wordpress.com


Saturday, May 17, 2014

Rustic Wedding I Do's and I Don'ts

Here are eight things to think about when planning your rustic wedding!


1. Not everything is or should be DIY. Unless you have five years to plan your wedding, then doing everything yourself is nearly impossible. You should pick a few personal touches such as your centerpieces, signs, gifts or bouquets to create yourself. Keep in mind, that every interior designer will tell you, spaces look best with both new and old elements. If you have twine covered mason jars, add a little glitz and glimmer by either adding candles, shine or sparkle. Keep opposites in mind and blow your guests away. Smooth and Rough, Bright and Dull, Hard and Soft, Tall and Short, Wide and Thin. 

http://boards.weddingbee.com/topic/centerpiece-help-what-to-do/


2. Stay away from craft stores except for the basic necessities i.e. glue, wire, tape,  ect… literally, only buy items that you absolutely cannot make yourself or find at the dollar store.  The whole point of DIY is to save money and craft stores have become pricey. Scour flea markets, garage sales, discount stores and thrift stores and don't forget to bring creativity. As for online. Visit sites like Freecycle, Pennysaver, Craigslist or the Backpages and look for unwanted items. Sometimes you can even find items that other rustic brides used for their venues that you can use for yours. 

 5 things to look for in your used/cheap item
  1. Can it be easily modified for your colors/theme
  2. Is it high quality? No one wants something that will fall apart before the wedding.
  3. Is it more expensive then buying it new?
  4. Is it a very inexpensive product, that I can easily redesign for very little
  5. Does it need shipped/mailed ect…


3. Say yes to handmade paper, lace and fabric flowers and and no to fake flowers. Fake flowers unfortunately look like, well, fake flowers. Everyone knows their fake, perhaps it's their plastic stems or unrealistic sheen that give them away, but most of the time they come off looking tacky. If you don't have the time or the patience to create your own flowers. Enlist some of your family and friends with green-thumbs to help grow you flowers. Keep in mind which flowers bloom when and also if anyone in your party has allergies to certain blooms. 


Here is my tutorial for Pretty Paper Flowers:


4. Rust is good, mold is bad. It's ok to use something a little dirty or rusty as decor for a rustic wedding, but if there are traces of mold which can be black, white or green, it is best to stay clear. These can add to allergies, be irritating to your guests and even cause illness. 

Green Mold on Antique Carriage


5. Rustic Restrooms are a no-no. It is not ok to go rustic here. There is nothing worse to watch than a $5,000 white, hand-beaded bridal gown being stuffed into a porta-potty. Yes, many barns have no bathrooms, so you should either upgrade to a deluxe porta suite with sinks and flushing toilets or switch venues. Unfortunate, but true. Everyone is paying to attend, some guests are even flying from out of state, so treat them like a welcomed guest, not like their there for a camping retreat.  Not saying you should eliminate the porta-potty idea completely, just make sure it is a secondary option. 


6. Rustic doesn't necessarily mean cheap. Forgo plastic cups, silverware and please, refrain from paper plates, there are very inexpensive ways to plate your dinner including mis-matched plates with a similar theme, buying used plates from someone who recently thru a wedding, or if push comes to shove renting plates and silverware from your caterer. Paper plates blow away, plastics silverware just can't take the pressure of cutting any type of meat, and plastic cups should be left for the fraternities. Oh, and absolutely no RED SOLO CUPS (except during the song ; ) )

No! Photo from http://www.teamjimmyjoe.com/tag/wedding-photography/#.U3fgz8bd5g0


7. Beware of Picnic Tables. I love the look of picnic tables. They have a certain charm and look like a great option, however, the women in your family might not agree. Many of your guests will be dressed up and many women will likely be in dresses. This means that women have to lift their leg over the seat to get into their spot at the table and could leave some guests with more unforgettable memories of your wedding then you would like to have. Also, picnic tables are nearly impossible to enter for the elderly. Think about your dearly beloved grandparents who can't make it up a flight of stairs, let alone try and climb over a picnic table. If you do still chose to use a picnic table, make sure you cap the ends with a couple wooden folding chairs for easier access. 

http://blog.tgkdesigns.com


8. Think outside the box. If you have been Googling rustic weddings you have probably fallen in love with mason jars, chalkboards, wood log bases for your centerpiece, radio flyers and of course lanterns! I am not saying that you should cut these ideas out completely, I'm certainly not, but you should add your own elements. If you love books concentrate on creating items using the pages and spines of books, if your hubby loves fishing, use old fishing rods, tackle boxes ect… the point is, take the basic ideas and then make them your own. You've chosen DIY and Rustic which means you have the opportunity to make it personal. 


http://blog.myweddingreceptionideas.com