Showing posts with label budgetweddingideas. Show all posts

Monday, August 11, 2014

20 DIY Table Number Ideas

20 DIY Table Number Ideas


1. Natural Wood Discs

 Use a permanent marker to in script your guests name and table numbers on pieces of wood. If you are using hand-carved wood make sure you smooth the back and front of the discs with sandpaper. Another option is using a wood burning tool to etch the names and numbers into the wood. 


Photo Credit: biscuitsandberries.com


2. Fabric Flag Numbers

These Embroidered Flags add a nautical touch to any wedding. If you don't know how to embroider you can use iron on numbers. 

Photo Credit: weddingbee.com

3. Twine and Wine

Use twine or yarn to wrap wine bottles in your wedding colors then number umber small chalkboard tags. 


Photo Credit: upcycledtreasures.com

4. Carved Straight from a Book

First use a stencil to outline your numbers. Then using an extra sharp exacto knife to cut through the paper on a cutting board. Use several pages to keep the numbers stable and separate the pages when you are cutting from the book to get an easier cut. 

Photo Credit:  Etsy- Love and Found

5.  Pose for a Picture

Whether it's a photo of your pet or of one you and your groom using a cute or funny photo will bring a personalized touch to your table set-ups.

Photo Credit: Heather Parker Photography

6. Books by Number

Grab some hard back books and remove the book jacket. Affix numbers to the front of the book leaving them bare or painting them to match your theme. 

Photo Credit: Next Exit Photography

7. Stencil Design

Stencil your numbers onto the end your table runners for an elegant display.


8. Dinner for Five

Re-imagine dinnerware to serve guest their seat by using a stencil and glass paint on a vintage plate. 
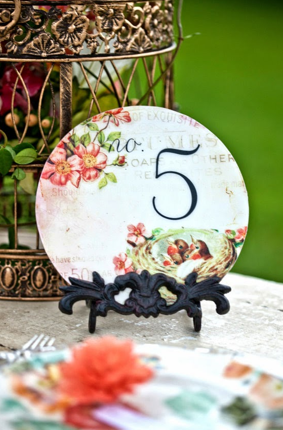
Photo Credit: Etsy Company 42


9. Yarn Numbers

First stencil your number design onto your wooden piece. Next use nails to outline your number. Make sure to use a ruler so that the nails are placed evenly. Begin by making a knot on one nail. Next wrap the yarn around the outside of a nail and work your way up and outline the number. After that weave the yarn back and forth to fill in the number. Remember to knot off the end.


10.  Under the Magnifying Glass

Use die-cut plastic numbers simply place onto a magnifying glass. You should not need any adhesive, but you can use a glue gun if necessary.

Photo Credit: kwp weaver photography


11. It's Dinner O'Clock

Use small clocks to tell guests what 
"time" they are seated. 

Photo Credit: rustic-crafts.com

12. Yarn Wrapped Numbers

Using a small amount of glue affix the end of the yarn. Next wrap your letter with yarn covering the entire number. 


Photo Credit: lover.ly

13. Corked Bottle Numbers

Using an old-fashioned or wine bottle slice into the cork and place your paper number into the space. 

Photo Credit: weddingbee.com


14. Steampunk Vintage

Take Vintage Frames and glue fabric or paper flowers to the top and then drape with pretty pearls. Print the numbers from your home computer. 

Photo Credit: Etsy Lis'

15. All for Wine and Wine for All

Choose you and your partner's favorite wine and customize the label with your table numbers and wedding date. Guests have never enjoyed table seating more. 

Photo Credit: marthastewart.com


16. Embroidered Numbers

Use pretty coordinating fabrics  to embroider your table numbers and leave them in the embroidery hoop. 

It's not that hard! : How to Embroider

http://www.instructables.com/id/Embroidery-101/


Photo Credit: www.weddingwindow.com


17. Hot Air Balloon 

Use helium filled balloon to create hanging whimsical table numbers. It's best to design these ahead of time, so either pre-paint the balloons using your own hot air or purchase pre-designed balloons. Create baskets using small plants and secure with twine or reinforced ribbon. 

Photo Credit: www.confettidaydreams.com

18. A Touch of Terrarium 

For an elegant setting place wedding numbers in a terrarium. 

Photo Credit: greenweddingshoes.com

19. A Watering Can Wedding

Paint your wedding numbers on an old watering can. If you must buy new, buy a watering can with a rougher exterior which will help the paint stick to the surface.

Photo Credit: thenaturalweddingcompany.co.uk

20. Mirror, Mirror at the Ball

Using glass paint brush table numbers onto vintage mirrors. 

Photo Credit: www.bellethemagazine.com


Don't forget all of these items can be mixed and matched to fit your taste and style. 

~Mandi Bridgeman


Tuesday, July 29, 2014

10 DIY Ways to Use Hay at Your Wedding


1. Tables Built of Hay

Using a smooth topper stack hay two high to create a great table space for drinks,  hors d'oeuvres or desserts.

www.rehearsaldinnerguide.com


2.  Dinner Seating

Choose this whimsical hay-centric dinner seating style.

funkyjunksisters.blogspot.com

3. Hay Ride

There is nothing quite like an old fashioned Hay Ride! Great for wedding guests as well as for photo ops! 
jamiefender.com


4.  Fire Pit Seating (Don't forget the Smores)

Let your guests cozy up around the fire with circular seating

stylemepretty.com

5. Cocktail Tables

Rather than rentals, drape a pretty cloth over bale of hay


Serbagunamarine.com

6. Nuptial Seating

Nothing feels more natural then an outdoor ceremony with straw seating

weddingsintheforest.tumblr.com

7. Cocktail Lounge

Create an intimate cocktail lounge with several small tables 

vi.sualize.us

8. Straw Sectionals

Bring the indoors outside with these comfortable couches and coffee table

juneberry-lane.blogspot.com


9. Photo Prop

Use a large round bale of hay as a prop for your wedding photos
hellomay.com.au

10. Ring Pillow

Opt for the un-traditional with a personalized pillow


www.soyouregettingmarried.com


Tuesday, July 8, 2014

Create Your Own DIY Paper Lantern with Rustic Wedding DIY

Create Your Own DIY Paper Lantern with Rustic Wedding DIY


* Coming Soon RusticWeddingDIY.com! 


            Supplies: 

Plain White Paper Lantern- You can find them on Amazon for around $2.00 a lantern
I used a 16"paper
Approx. 12 Sheets of 12" x 12" of Card Stock/ Scrapbooking Paper
Circular Template, Round Object or Extra Large hole punch
Glue Sticks and Glue Gun or Tacky Glue
Led Lantern Lights

Approx DIY Time: 8 Hours


Start by finding a round object (I used a perfume bottle) and trace around the object or trace the interior rim of your template onto the blank side of the paper. If you are using a circle puncher, punch out circles. 


This is the size of the cutouts I used for my lantern. Feel free to print and use as a guide for your project. 


Try to utilize as much of the paper as possible by tracing all the circles before you begin attaching them to the lantern base. 


Next cut or punch out circles and begin attaching them to the lantern base starting at the top using your glue gun or tacky glue. Hold the circle in place until the glue has dried. (This is why I chose a glue gun because it dries faster.) Also make sure you cover any white areas. 


Tip: Place the next layer directly under the top layer when working at the top and bottom of the lantern so that the white does not show. In the middle the circles lay flatter and can be more spread out. 


 All the circles should be glued on from the top and loose on the bottom.

Work your way down the lantern till all of the white is covered. 

You can chose to alternate colors and patterns or you can use one uniform color.  


Use only LED lights* to light lantern. Using a regular lightbulb can cause the glue to soften and circles may dis-attach. * I found mine on Amazon


Rustic Wedding DIY Contributor- Mandi Bridgeman 


Coming Soon RusticWeddingDIY.com!


Join Rustic Wedding DIY on 

Facebook: https://www.facebook.com/rusticweddingdiy

Twitter: @rusticweddiy

Tumblr: http://rusticweddingdiy.tumblr.com

Pinterest: http://www.pinterest.com/rusticdiy/

Google+ and You Tube: Rustic Wedding DIY


Monday, May 19, 2014

The Best Fabric Choices for Rustic Weddings


Here is a guide to picking fabrics for your Rustic Wedding 

Lace- Sweet, Soft and Innocent. This traditional wedding fabric can help soften the look of rustic decor. Use for table runners, to decorate centerpieces, or use on anything else that needs sweetened up. 

http://www.occasionsonline.com

http://www.calierose.com


Burlap- Quite the contrast to lace, this heavy duty fabric can be used in a million ways even for your own bouquet. 

gypsyfarmgirl.blogspot.com


Gingham- We're not talking about the red and white farm table kind, but the sweeter pastel cousin. 

http://www.pinterest.com/pin/135389532520384721/
https://www.etsy.com/listing/75139108/vintage-gingham-banner-bunting-21-fabric?ref=market


 Stripes- Whether thick or thin stripes are a great choice for your wedding. Just keep in mind the wider you go the more nautical your wedding theme will seem. 

http://wildflowersinc.com


Modern Prints- Mixing Modern Prints with Rustic Charm takes your wedding to a whole new level.  Just keep in mind that although you may love a print this year, anything trendy might be out of style next year (aka Chevron). Try to pick a new print you love, rather than picking what's hot at the moment or stick to classics like nautical stripes, houndstooth pinstripes and polka dots. 


http://www.pinterest.com/thebridesshoppe/teal-wedding-inspirations/

Textured Fabric- There aren't many inexpensive ways to get the look of opulent textured fabrics, but you can always look for used or rent it to save or use this great idea for a twin sized bedskirt! Whether glitzy or luxurious textured fabrics will add a individual accent to your decor. 


emmalinebride.com

thingsthatsparkle.com
weddingbee.com
Florals- Whether you go petite and simple or go for a bold statement, flowers can make a pretty statement. 


These are just a few of the basic choices for a rustic wedding. Rustic Weddings leave you room to add personality and flair to your occasion. Please don't forget to subscribe and share for more ideas like this! 

Rustic Wedding DIY can also be found on: 

Facebook
Tumblr
Google +
You Tube
 & Pinterest